March 21

“Sparking” Creativity

Often my ideas for tools to share come from questions of colleagues. Keep the questions coming! 🙂 Today I was asked about free online video creation tools. As we looked at a tool I had previously used that was once free (WeVideo) we found it now to be a subscription based service with a hefty price tag. So instead I suggested a relatively new tool called Adobe Spark.

This tool allows you to create media in various forms, Posts (for social media graphics), Pages (more of a presentation style tool) and Video. Since this is a tool from Adobe, the emphasis as always is on professional looking visual composition. Its ease of use and its cost (FREE) make it worth investigating. It has many features that automate the editing and design process, but still allows for customization.

The web version of this  tool wraps all three of the design platforms into one, but there are also mobile app versions of each; Adobe Spark Post for social graphics, Adobe Spark Page for web stories, and Adobe Spark Video for animated videos.

Creating an account can be done quickly by using either a Google or Facebook login or by creating a new account independent of those. A downside is its use in the classroom with all students. Currently it doesn’t have the capability of creating student accounts with a teacher login. Maybe that will be coming soon. Older students with Google accounts could sign up themselves. Adobe Spark is certainly a tool that you could use to spice up your lesson presentations or use personally to create professional looking videos.

I’ve included a link to a more extensive review as well as a short tutorial video on how to use.

Enjoy!

March 7

Can I “Sway” Your Opinion for Using “Sway”?

This week’s tool chosen for review is Sway. Many of you have seen how this tool works and most of our 6th graders in the district have had some experience with it. I think it is one of the better and easier presentation tools available to us through our Office 365 accounts. It is free as well to those who choose to create an individual Microsoft account. It can be found at https://sway.com/education/. Its uses are many. It allows you to create interactive classroom or business presentations easily. Digital stories and even student portfolios for work could be created with this tool. To describe it simply, it’s a tool somewhere between Powerpoint and Prezi. It’s cool without making you dizzy, like Prezi sometimes can.

It’s an online tool so there is no download needed and can be created/viewed on any device. Simplicity of use is one of its best qualities. Some of our 6th graders watched the 4 minute tutorial and within minutes were moving through it creating their content. They added photos, videos, audio, charts and even tweets as they were suggested within the “add” capability. There are suggested items to add that are driven by the text that is input into the “cards.” Beyond the suggested items, Sway is also connected with Flickr, Bing, Pickit, One Drive, and Youtube. Choosing images/videos from your own account within each of these services along with those stored on your device is an option.

How to use:

One of the best features that I have found is the incorporation of Creative Commons licensing. It gives a check box that when marked will only pull those items within the CC license. There is even a link to learn more about copyright within the disclaimer agreement above the image/video content that states “You are responsible for respecting others’ rights, including copyright.”  If this box is unchecked it will pull all results based on the term search. That could be a problem if students choose to remove that option.

There are many design options and they are customizable. What I did find limiting was the fact that there are only 3 layouts which can sometimes not fit the design in mind.

The option to collaborate with another author is also available as well as the capability to share out with a link or embed code. Embed code can also be used in the Sway itself which could technically allow you to embed a Sway within a Sway.

As mentioned above I could see this being used for general presentations, as well as housing student work to be shared as a sampling for parents or even in more detail as a student portfolio. For vocabulary purposes, it could be used to introduce vocab within a lesson or students could create their own study guides of vocab and share through the link with classmates. Since these can be embedded and even remixed by another if you allow in the settings, students could begin creating a personal study tool for their vocabulary.

Lesson Plan idea for its use along with Sway example:

Sway Lesson

March 1

Shadow Puppet EDU ~ Simple, Fun, Powerful!

This week’s tech tip is about an app I recently found called Shadow Puppet. Now I apologize to you Android device users because this is for use with iPhone and iPads. It was just too good not to share.

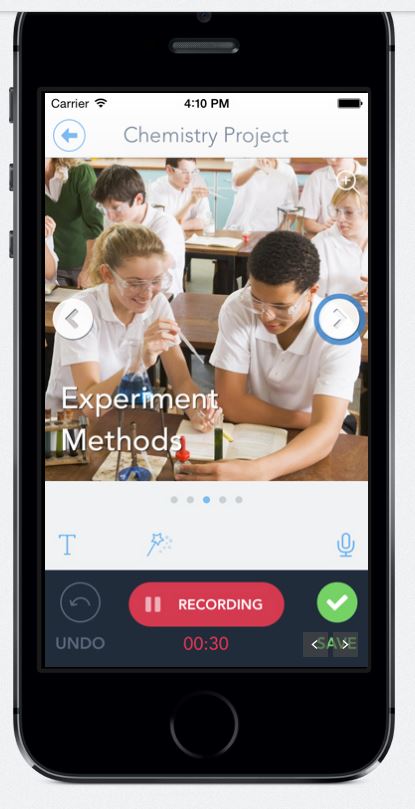
This is one of the easiest video slideshow creators I’ve seen. You’ll find the EDU version of the app in the iTunes store. It’s FREE and it allows you to make videos up to 30 minutes long using up to 100 images. These videos could be created by the teacher to explain an idea or document student progress to share with parents. Students could create to tell a story or share their work. The images can be those within the camera roll of your phone or you may search for images right from within the app. Image search links out to sources such as the Library of Congress, Metropolitan Museum of Art and NASA.

Creating a video is as simple as:

  1. selecting and/or searching for images and placing them in the proper order (they can be reordered easily by dragging and dropping)
  2. adding background music, if you’d like, from a list within the app or from your iTunes library
  3. recording voice narration as you scroll through the images
  4. saving video to device or sharing with many options for this

There are editing options which allow for fading in and out within images and adding text to them. Rerecording of audio can be done on each slide rather than having to do it from the beginning.

Within the app there is an idea section with 30+ideas organized by topic and include CCSS alignment. And if these aren’t enough ideas, there is a site available for support and even more classroom ideas. Downloadable storyboards, story maps and more detailed instructions for use can also be found here.

Sharing of videos can take many forms, from sending via direct text message or email, to posting to YouTube, Twitter or Instagram. This is easy, and yet something that you need to keep an eye on in terms of student privacy.

So don’t let the simplicity of the tool and its name make you think it’s not powerful. The ideas for its use are many and broad. So go out and have some fun with Shadow Puppet!


February 21

Plickers ~ Could be a Formative Assessment Game Changer

Plickers

Had a question from a colleague during in-service last week asking about the app that acts like a student response system. I know I may have shown this to some folks previously, but it’s worth revisiting. It’s called Plickers. There is an app for both iOS and Android devices as well as having a web interface that allows you to input questions more easily and access a “live” view in order to project questions and result to the whole class.

This is a free “polling” app that allows you gather student responses to teacher generated questions without the students needing a device. Each student is given a card (these are printed from the site) that contains an image that looks similar to a QR code. This code is used to show the student’s answer choice (A, B, C, D or T/F). The student holds up the card and the teacher uses the app on their phone to quickly scan them. Answers are immediately populated on the teacher’s device, and as I said earlier, if projected in “live view,” they also populate for the class to see. This is a great tool for formative assessment. Often, this app is best shown in action to get the whole picture of how it works so I’ve added a video about set up and how the scanning works. The video opens at the 15:39 mark with scanning. The complete video will walk you through the setup process as well.

Pros:

Free
Easy setup
Real time data gathering
Increases student engagement
Same card can be used over and over
Great “help” section on the website

Cons:

Cards have to be printed and possibly laminated to be more durable and lamination could show a glare.
Response choices are limited to A, B, C, D and T/F


Enjoy!

February 15

Thinking About “thinglink”

Thinglink is a very easy to use platform that allows you to layer videos, music, text, links and even voice to images in order to make them interactive. It can help you and your students present information in a different way.

Because it is visual in nature it may help those students who need that extra support to better understand a concept. Within the site are many examples that could help you with ideas and inspiration for ways to create your own.

You may create a basic account for free, and, yes, there are a few limits, like the type of icons you may choose. There is an EDU account for $39 a year, which allows you to create 5 classes and give access to 500 students. Students can be added without an email, invited via email or they may sign up themselves with an email. If you choose to create classes within the site, you can provide a class access code to the students once they are logged in that will link them to the class.

Once you have created an account, the creation of a “Thinglink” is quite simple.

  • Sign into your Thinglink account (can be a personal account or an education account, which allows for classes and students).
  • Click “Create” to start a Thinglink; choose a background from your local computer, the web (after reminding students how to safely use online images), or a variety of Cloud accounts.
  • Add hotspots that link the viewer to multimedia resources. This includes text, images, videos, and audio recordings. Beware: They must be hosted in the cloud and accessible via a link, not on the local device.
  • Save; share; e-mail; embed.

Created for a teacher professional development session:

Created by a 2nd grade student:

Classroom application ideas:

  1. Create infographics and graphic organizers to visually explain a complex topic.
  2. Design and share interactive digital posters.
  3. Curate resources for a topic or project and share with students.
  4. Share out an image to students and ask them to annotate it with hotspots discussing what they see. This can serve as a formative or summative assessment.
  5. World language or ESL/ELL teachers can add audio or video links to images that clarify understanding.
  6. Create a class picture with quick student-written information to share with parents or grade-level teachers. This is best accomplished by creating a class account that students access with a common login.
  7. Create a digital portfolio of student work over the course of a year, to be shared with parents at open house or the next year’s grade-level team.
  8. Create a timeline of events that includes appropriate multimedia resources.
  9. Share student artwork, adding an audio element that allows them to explain their creation or share a story they’ve written to accompany it.
  10. Social Studies/Geography classes could use maps as the image and have students add facts and details about the location.

The ideas are truly endless with this simple and versatile tool.

January 31

Microsoft Educator Community

Looking for a place to find teaching resources, cool virtual field trips, free trainings and more? Well that place is the Microsoft Educator Community. Access to all of these great resources is available through your Office 365 account. You just need to join. (Directions for joining can be found at the bottom of this post.)

So you are probably asking, “What will I find in this community?”

Here is a list of some of my favorite tools in the site:

Skype in the Classroom

  • Guest Speakers – Through Skype in the Classroom you can easily access guest speakers who are at the ready to share their knowledge with your students. Just search by subject and age group to find a great guest speaker best suited for your class.
  • Virtual Field Trips Not only can you bring visitors to your classroom, you can also take your students to far off places…virtually. The virtual field trips available in the Microsoft Educator Community are growing every day, and searchable by grade level, subjects, country destination and more.
  • Play Mystery SkypeGet your students guessing about geography, cultures and students across the globe. Mystery Skype is an interactive learning game in which two classrooms use Skype and ask a series of questions to guess each other’s locations. It’s exciting for both classrooms (and teachers!) involved. Connect with other classrooms who want to Mystery Skype.

 Lesson plans that are ready to use

The educator-created lesson plans fellow teachers have shared in the community are effective, curriculum-aligned and simple to locate for your needs. There are poetry lessons for third graders and world geography lessons for middle school students that mesh perfectly with our curriculum.

Lightning fast how-to videos

These videos are perfect for those times when we do not need a major continued learning course, but do need to learn how to make an infographic … pronto! That’s where these Quick Tip Videos come in handy. They are two-three minute videos that clearly and concisely answer common technical questions.

Courses for professional development

But when you want to take the time to really increase your educational knowledge base the Microsoft Teacher Academy courses are a great start. Search by skills development category, subject areas or student age group to locate the courses that will best bolster your skills. There are even courses that can teach you how to code!

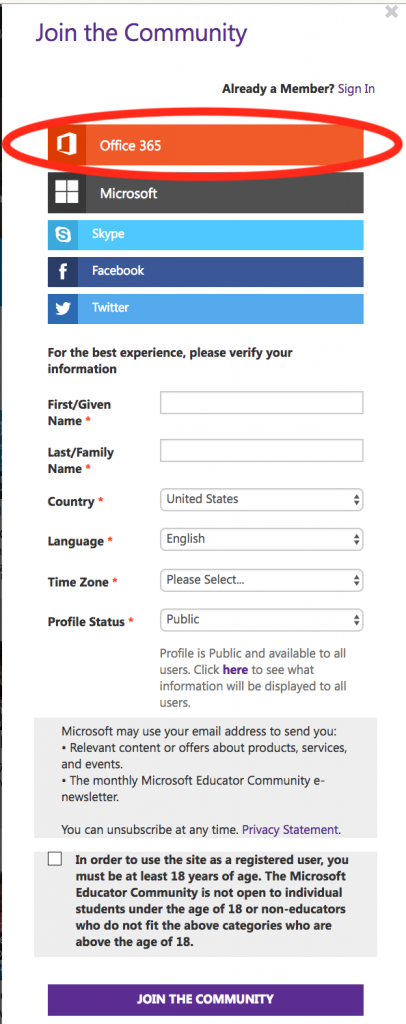
How to Join:

  1. Go to Microsoft Educator Community
  2. Click Join Now


  1. A textbox opens that requires your credentials. Make sure you choose the Office 365 option at the top.

As always, if you need any assistance with the site’s use or help in setting up a Skype lesson please contact me.

January 23

Ever Puzzled About Ways for Students to Interactively Participate with Video? Your Solution is EdPuzzle!

EdPuzzle

What is EDpuzzle?

EDpuzzle is an incredibly-easy-to-use video platform that helps teachers save time, boost classroom engagement and improve student learning through video lessons. EDpuzzle also collects data as students watch and interact with the video. Best of all, it’s completely free!

  • Take any video from YouTube, Khan Academy, Learn Zillion, etc.
  • Re-use other teachers’ video-lessons from EDpuzzle amazing video-collection.
  • You can also upload your own videos directly from your computer or iPad.

How to transform a video for a lesson:

  • Crop the video, use only what you need for your lesson.
  • Record your voice on top of it to explain it in your own personal way, add clarifications, a warm introduction, you name it.
  • Add quizzes along the video to check if your students truly understand the lesson. Great tool for formative assessment.

Classroom Connections:

Videos can be assigned to students individually (through a class code) so they may watch repeatedly until they are comfortable answering the questions correctly. This could be especially helpful in foreign language classes and science where the content may need to be reviewed several times for comprehension.

If individual computers or devices aren’t available, videos could be projected to whole groups and students could simply answer questions on paper. This still keeps them engaged with the video.

Students could create their own video lessons which they could share with own class or others across the district, or maybe even globally.

Edpuzzle can provide you with a great way to edit videos to keep students fully engaged during their lessons in any content area. Its easy-to-use features can be learned in only a short time, and students can greatly benefit from the enhanced lesson videos. Best of all, EDpuzzle is completely free!

Watch this short informational video below to see its ease of use:

August 4

It’s been called “The Swiss Army Knife” of Apps!

I’m talking about Explain Everything. This app, available for iOS, Windows, Chrome and Android platforms, was shown to me by, Rhys Daunic (The Media Spot) while recently attending  URI’s Summer Institute in Digital Literacy. This interactive whiteboard and presentation app allows for the creation of content, not just the display. Using an iPad with Apple TV or a Windows device with an add on such as AirServer, you can not only project the content of Explain Everything to a plain whiteboard surface (or even a wall for that matter) you can annotate within it just as you would a wall mounted interactive board. Presentations can be created within the app very simply. Similar to PPT you can create slides from templates within the app or you can import pictures, videos and live webpages as you like, all of which can be scaled, edited and even annotated. All that you do within the app can also be recorded as a screencast. One of this apps’ best features allows for screencasting using the front facing camera of your device and adding as if it were a picture in picture. Each of the screencasts can be edited via a project timeline and they can be exported to your favorite video sharing site.

There is a free trial version for Windows ($2.67 per year after) and the per app cost in the App Store is $5.99 (one-time purchase) for the classic version. For those schools with Volume Purchase Plans in the App Store, the per app cost is $7.99 (one time purchase) for a more robust platform that also incorporates a collaboration feature.

I have seen and tested many interactive whiteboard apps, but Explain Everything, by far, exceeds the others with its capabilities. The cost also makes it very attractive. Other IWB apps can exceed $40. Granted, you have to have an additional app or an Apple TV through which you connect, along with an LCD projector to display, but when you add it all up, it still doesn’t even come close to the cost of wall mounted boards. Those will run several thousand dollars and are not be able to do what Explain Everything can do. If only this had been available before school districts spent very large sums on IWBs that now serve as lovely projection screens in most classrooms!

Classroom Connection:

The most obvious way of using this tool is for the “flipped classroom”approach. Recording a lesson and posting for students to view prior to or after class as reinforcement is a great use. Imagine sending a “home bound” student a lesson, created as you taught it, for them to share.

Students could create their own presentations explaining the process they used for solving algebraic equations, or anything else for that matter. The actual steps of the work can be written and recorded within the app and then an audio or video explanation by the student can be layered with it to give an authentic assessment of their understanding.

More ideas for this apps use can be found at Explain Everything Discover.